You may have taken the time to create relevant, engaging and expert content. You may have linked to high authority sites and ensured proper content distribution. However, when people visit your site, it takes too long to load. They may wait a while. After a few seconds, they will likely leave and never come back.
Site speed is one thing you should never sacrifice. I go by one simple rule, control the controllable and focus your energy on solving actual problems. Site speed can be controlled in many ways and multiple reasons why your site might not be loading fast enough. I’ve taken on this experiment to help fellow WooRankers optimize their own WordPress site given that many have requested it.
Let me give you context to how I conducted my experiment and how I reached my goal. I started a peer-to-peer story sharing and news site called WhyMedellin with a friend using Inmotion Hosting Power Plan. I used the theme (Newsmag by TagDiv) and my load time was averaging 12.75 seconds without any changes to my WordPress site. I’ve only contacted my hosting provider to make changes when I freaked out that my site speed was at 16-17 second range.

I’ve sent my site to all of my friends and increased my monthly visits to 500 per month. Based on this, I’ve checked my average time based on different time periods.
The results are in Pacific Standard Time Zone and in seconds:
- 8:30am 13.73
- 9:30am 16.23
- 10:30am 26.02
- 3:30pm 34.06
- 4:30pm 22.27
- 5:30pm 17.96
I decided to use inmotion hosting provider because of the reviews I’ve read all over Google. However, I could not determine if the hosting was the issue or the theme I used that made the load time unbearable. Still, this made me want to challenge myself to see how much I can reduce load time. To help you see what I was working with, my Plugins consist of:
- OneSignal – push notification
- Google Adsense
- Disqus – Commenting system with ads
- Google Analytics
- MailPoet Newsletter
- WP-MAIL-STMP
- EventOn
- All In One SEO Pack
- Instagram Feed WD
- Visual Composer
- TagDiv theme, mobile theme, social counter
- Cookie Consent
We will be adding in few plugins during this article to help with your site speed and optimization.
Below we get into WordPress site speed, what it really is, its importance, how to measure your own site’s speed and how to increase it.
Understanding WordPress Site Speed
Every second counts, at least when it comes to your website. But do you really know what site speed is? This will be a good place to start before we get to how to increase WordPress site performance.
1. Page load time
When we talk about site speed, we subconsciously refer to page load time. Page load time can be defined as how long it takes for a particular web page to display the entire content. It is measured in seconds.
Speed Up Your Site!
Need tips on how to optimize your page load time? Click here to access our FREE SEO Guide2. TTFB
The TTFB – Time to First Byte is the time from when a user makes an HTTP request (by entering a keyword or URL) to when the user’s browser receives the first byte of the page. In simpler terms, it is the time it takes for a site to begin loading. The smaller the TTFB, the faster the site loads. Google measures page speed by time to first byte.
3. File size
Huge images in high resolution make a website appealing. However, if your WordPress site has many images or even just a few large ones that take up too much memory, the site loads slowly.
4. Servers
The number of servers, their capacity, how powerful they are and the bandwidth to handle multiple user requests at the same time all affect a site’s speed.
Is Site Speed Important?
Now that we have a clearer picture of what site speed entails, the next question we should ask ourselves is, is site speed important?
1. Google rankings
To answer this question, we are going to refer to a post on the Google Webmaster blog. The blog was posted in 2010, but we can still see its significance to date. The blog post cited that site speed was going to become a vital part in Google’s ranking algorithms.
Following that announcement, Google created PageSpeed Insights, which allows you to analyze your site’s speed. We will look at how to to do this later on.
If Google will be using site speed in its rankings, it means that if your site loads slowly, it will rank lower in search engine results. This will definitely affect your traffic and conversions since most people will not go past the third result on SERPS (search engine result pages).
2. User experience
As mentioned above, 80% of users will leave a site if it doesn’t load fast enough. Site speed is, therefore, important for user experience. User experience is also closely related to search results rankings. Google ranks sites where users spend a longer time higher.
How Do You Measure Site Speed?
You cannot afford to rank lower in search results due to a slow loading site with high bounce rates. You need to know how well your site is doing with regards to speed.
WooRank
Working on WordPress might seem easy, but when you review your site, you might run into a few issues you might not know about. During my optimization test for my WhyMedellin.com site, I found out that a few plugins might break some paths. While I attempted to optimize my WordPress site, I’ve gained quite a few gray hair, but WooRank helped me identify issues that I couldn’t see with the naked eye.
Performing a website Review helped me identify what was working, and if it caused issues, such as:
- Redirect and XML-RPC-PHP 404 error:
- Viewport error based on certain optimization plugin
- Fluctuation with Mobile friendliness, Mobile Speed, and Site Speed.
- Site Crawl errors based on few plugins
- Non-speed related issues like finding the best way to detect social networks for your site
On the surface, your site might look and feel fine, but the devil is in the details. While avoiding adding multiple plugins is the best solution, sometimes it’s inescapable. I’ve probably spent several months reviewing my WooRank review to see my progress and I can tell you from my personal experience that you cannot simply optimize your site without this tool to help you identify the best path, find if certain plugins are causing issues for your site, and if the plugin is helping at all.
How To Increase WordPress Site Speed
Now that we have identified what might go wrong with your site, it’s time to fix it. There are three aspects that you need to look at when you want to increase your WordPress site’s speed. These are:
- Web Performance Optimization (WPO) – This refers to the techniques that aid in the optimization of web page speed. You need to analyze all the components of a web page and optimize them to improve the page load time.
- Server Maintenance and monitoring – this entails monitoring server and databases to determine their performance, capacity, and availability.
- Infrastructure – this is a focus on the server’s capability and capacity. How much traffic can it allow simultaneously?
The above three factors are what we touched on when we were defining site speed. They are the same areas we will focus on when looking at increasing site speed.
Let’s Dive Right Into the Solutions:
1. Hosting provider
Your hosting provider could be the cause of your low site speed problems. Some cheap hosting options or shared hosting may not be worth your while when it comes to speed. You may want to ultimately go for individual packages or change hosting providers. In a number of web experiments, hosting via WP Engine and Pagely has shown some improvements in WordPress speed site. While those two hosting providers cost more than others like Inmotion, Bluehost, Greengeeks, etc. It really comes down to your site needs.
Most sites will more likely than not you would want to scale your site from shared hosting to dedicated hosting. The issue is having the site run at different load speed based on your hosting provider distribution. Your WooRank load time might fluctuate based on the time you refresh your reviews. I would recommend recording your site speed based on the hours and then check to see if your site traffic peaked within that hour to determine if the site speed was adjusted due to traffic.
You can also contact your web hosting provider and they might nudge the speed increase based on your current WordPress setting. Here is what Inmotion Hosting recommended when I contacted them about my speed issue:
In many cases where the performance of a website is lacking, whether is was faster when with another host or otherwise, there are a number of reasons that this occurs. Typically our servers are using PHP 5.6 for compatibility though later versions of PHP such as 7.0.x or 7.1.x may be nearly twice as fast while potentially using almost a third of the memory (Source – https://www.phoronix.com/scan.php?page=news_item&px=PHP-Tests-PTS-6.4). Switching to PHP 7.0.x or later may cause compatibility issues with older Content Management Systems (CMS) or custom-coded sites though tips on migrating to later versions of PHP are publicly provided via the official documentation (Source – http://php.net/manual/en/migration71.php).
At this time I have modified the following two files which have improved your site’s load time:
/home/FILTERED/.htaccess

/home/FILTERED/.php.ini
I would recommend first to contact your web hosting provider to see what they can do to help before you make any attempts to optimize your WordPress site. If you are on a shared hosting provider, you might see your WooRank Load time review fluctuating based on their distribution.
- Disable default wp-cron.php behavior
By default, your wp-cron.php runs every visit to basically ask if they have any tasks. When visitors starts rolling in, having your wp-cron.php run multiple times the same hour might not be efficient, the script can be called hundreds of times an hour. However, you can setup a manual cron job to run this instead (approximately 4 or 6-hour interval).
You can go to your cPanel and go to your File Manager editor.
Open your wp-config.php file and add this code around line 37, then click Save.
/** The Database Collate type. Don't change this if in doubt.

*/ define('DB_COLLATE', '');

**define('DISABLE_WP_CRON', 'true');**
Then, you can go back to your cPanel and go to Advanced Settings > Cron Jobs.
You will change the Common Settings to Once Per Hour.
From the Hour drop down, Select Every Sixth Hour.
You will then need to add this code on the Command section:
cd /home/**YOURUSERNAME**/public_html; php -q wp-cron.php
Make sure to change the YOURUSERNAME to your cPanel username. Also, this tutorial is for primary domains, if you are using any subdomain, you will need to update your path.
B. WordPress autosave and logout of your Dashboard
WordPress will autosave your activity and it goes to /wp-admin/admin-ajax.php script. If you tend to forget things and accidently not save your drafts, this feature is pretty handy. However, disabling this autosave feature can sometimes limit hundreds, if not thousands of these requests.
Another simple solution is staying logged out of the admin when you’re not using it.
You can go to your cPanel and access the cPanel File Manager Code Editor.
Look for wp-config.php file and Enter:
* @package WordPress
*/
**define('AUTOSAVE_INTERVAL', 86400);**
// ** MySQL settings - You can get this info from your web host ** //
Be warned and remember to save your draft. We just disabled autosave to 86400 seconds, which is an entire day.
2. WordPress theme
WordPress is the most popular content management system, powering about 27% of the sites on the internet. Despite this, WordPress’ site speed has remained relatively low. High functionality themes with impressive features make a WordPress site attractive. However, they require more CSS and JavaScript to run effectively. They also have bigger TTFB. It is advisable to go for lighter WordPress themes.
There is a difference between load time and your themes perception of loading the site. While my site load time averages about 13 seconds, the site felt like it loaded a lot quicker.
Hiring a WordPress developer to build your custom theme is the best alternative to a lean WordPress site. If you do not have the resources a strict process of selecting a theme would be the next best thing; knowing what you’re trying to build and some knowledge of CSS. Try looking for specific, dedicated theme based on what you want to build. Some themes have hundreds if not thousands of lines of CSS code that can ruin your site speed. While there are some solutions, it’s best to eliminate any line of code that you won’t be needing. You can validate your theme code efficiency by going to W3C Markup Validation Service
If you already installed a theme, you can install the Theme-Check plugin to help provide some helpful tips to get the best performance possible from the theme you purchased or created. While it does not provide every solution to optimize every aspect, it can definitely eliminate some obstacles that are reducing your site speed and SEO. Warning: You need to know PHP programming language.
3. Optimizing different components of your WordPress site
Like we have been saying, large files will slow your site down. You need to optimize your files (images and caches). You should ideally optimize your images before you even upload them to your site. Let’s delve more into this below:
How to optimize images
How you decide which image format to choose can either increase or decrease your site speed. There are a few PNG and JPEG comparison, but it really comes down to your needs. PNG image format is uncompressed, so the image will be higher quality with more detail. The compromise is that the file is larger and it takes longer to load.
JPEG is compressed file format which slightly reduces the image quality and smaller in size. Decide which file format to use based on your image needs:
- If your image has a lot of different colors, use JPEG.
- If it’s a simple image or transparent image, then use PNG.
While there are few plugins you can use to help image optimization, you will see that it does not show significant progress. The best option is to crop and resize your images before you upload it to your WordPress site.
I’m using these plugins to help optimize images:
However, my Review still shows that my images are not optimized to Google’s criteria:

In most cases, you can measure the layout of your WordPress theme and how big your images will look when you upload them. You can Google search “Image resize” and you’ll find a ton of free sites where they can reduce your image before uploading them to WordPress.
How to optimize caches
Optimizing caches clears site cache instantly. This way, your servers have less to do. You can also use some plugins to optimize caches on your WordPress site. You can use the W3 Total Cache.
When using plugins, look out for plugins that will conflict with others.
How to increase your speed with W3 Total:
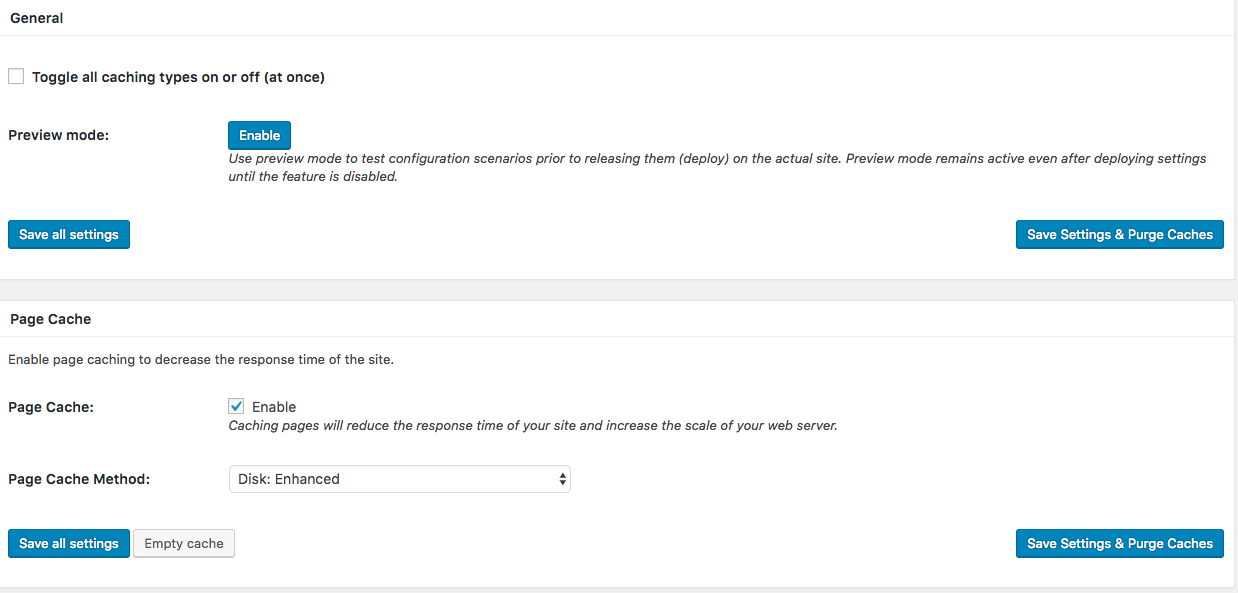
Once you installed the W3 Total plugin, go to the General Settings, here we will be making few changes.

1) Make sure that the “Toggle all caching types on or off (at once)” are DISABLED.
2) ENABLE Page Cache
3) DISABLE Minify, since we will be using Cloudflare CDN.

4) DISABLE the Database Cache.
5) ENABLE Object Cache
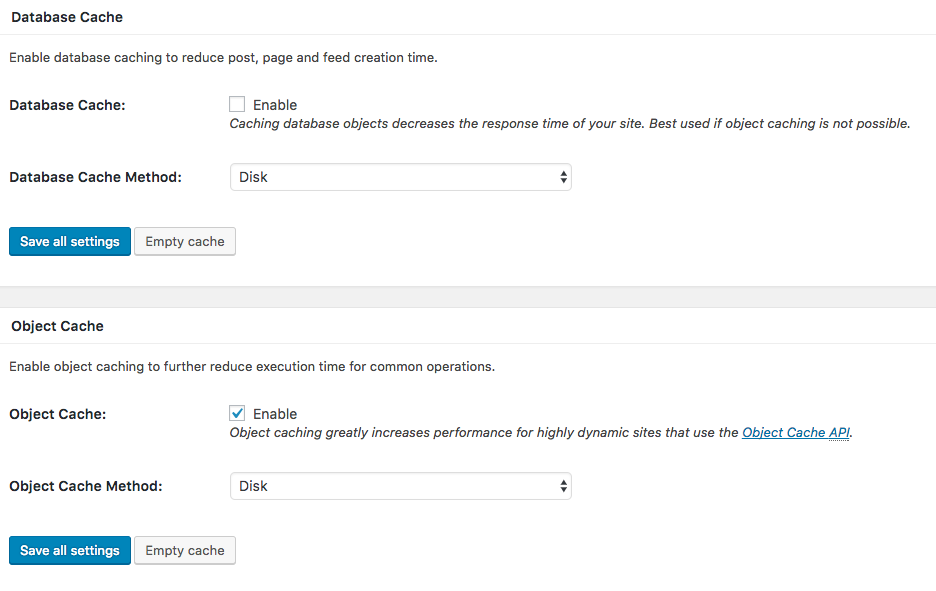
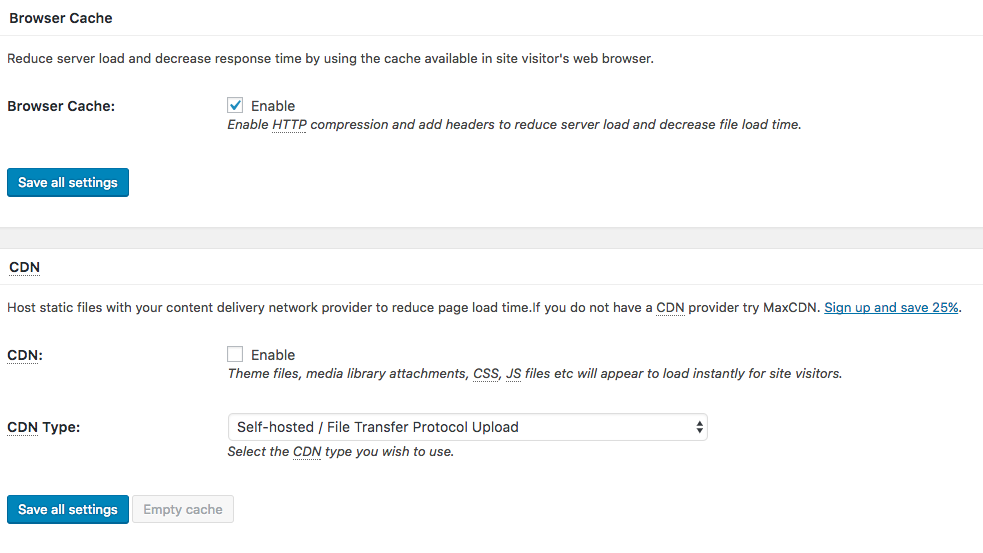
6) ENABLE Browser Cache
7) DISABLE CDN, we will be activating the CloudFlare extension instead.
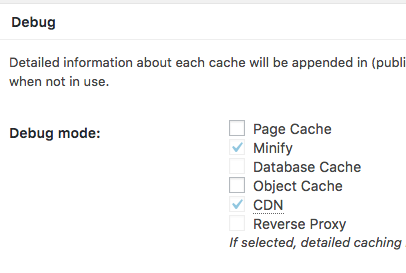
8) Make sure you’ve UNCHECK all Debug Modes:
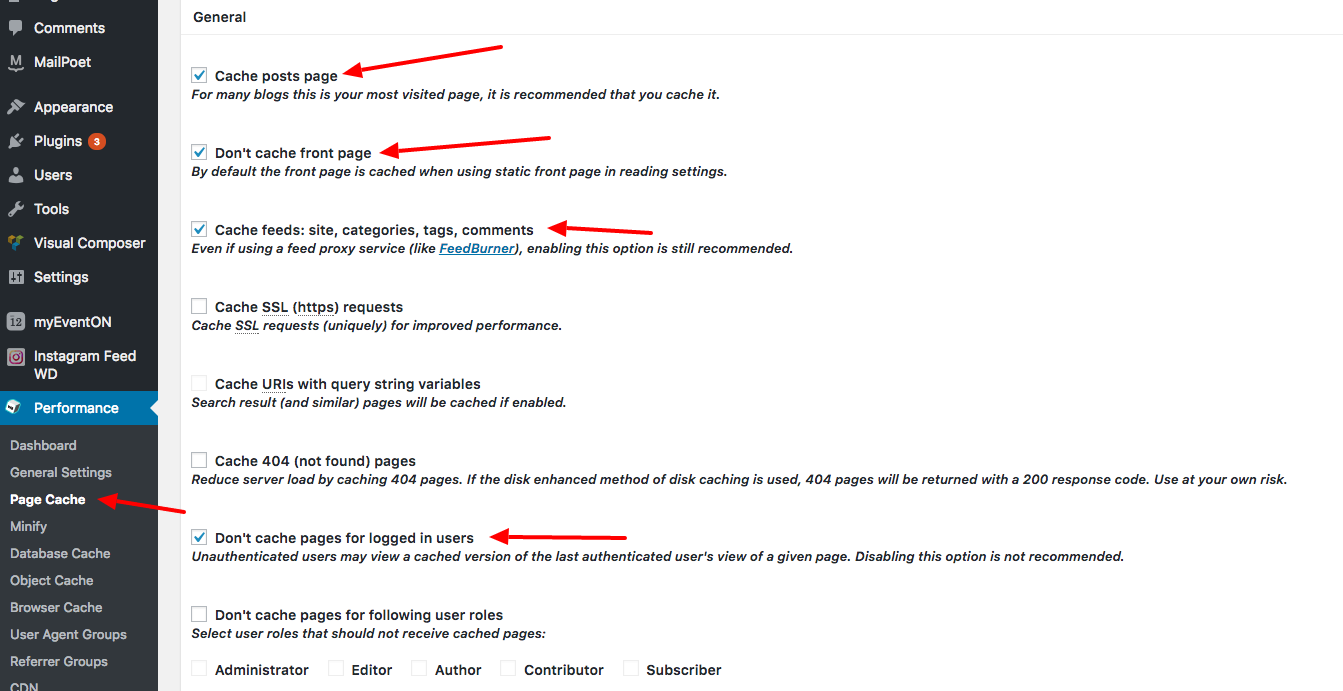
9) Under Page Cache, make sure you’ve checked these settings below:
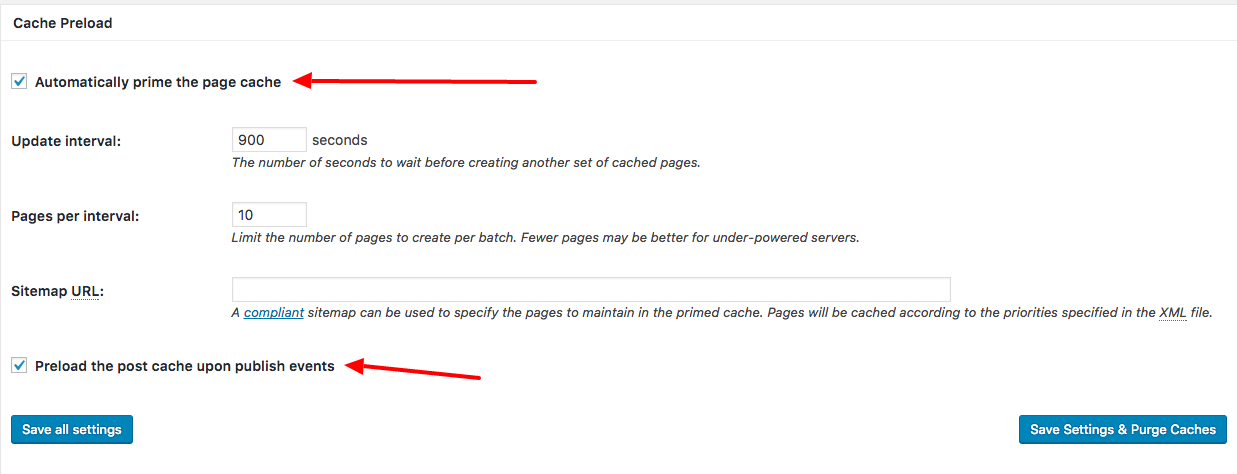
10) Scroll down and have the “Automatically prime the page cache” and “Preload the post cache upon publish events checked”.
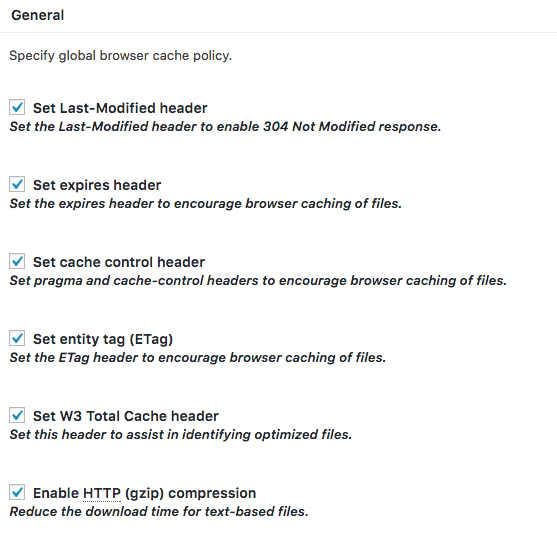
11) Under the Browser Cache Settings, have the following checked and enabled.
12) Under the “Extension”, Activate CloudFlare. Once you’ve activated, we will sign up for a free Cloudflare account from their site.

4. Why use a CDN?
One of the reasons why a site’s speed decreases are due to having all your files on one server. All your website files are usually stored in an “origin server”. When a user makes a request, the origin server receives it and responds. If the user is very far away from the server, it will take longer for them to receive a response. This results in slow site speed.
A CDN, content delivery network, distributes the site’s static files to different servers around the globe. These networks temporarily store the site’s static content on servers that are closer to the user’s location. When a user makes a request, they are directed to the CDN edge server that is closest to them.
Some popular CDNs are MaxCDN and Cloudflare. CDNs are ideal for sites with high traffic.
With a CDN, you can save over 60% of the site bandwidth that you pay for and reduce over 65% of the requests that your site handles. You can reduce the page load time by 50%.
CDNs also increase your website’s security. If a hacker makes a request, the CDN is able to block the malicious request before it gets to the origin server.
Now that we understand how CDNs help to increase site speed, let’s delve more into one of the most popular CDNs: CloudFlare.
An Overview of CloudFlare
CloudFlare has a free option, for obvious reason, we will be using them. It automatically caches static content on the site. You need not configure it after it starts running. It’s also able to effectively minify HTML, CSS and Javascript without installing plugins via W3 Total Cache.
How to set up the free version of CloudFlare
You can follow the instructions based on these links:
Step 2: https://support.cloudflare.com/hc/en-us/articles/205195708
Step 3: https://support.cloudflare.com/hc/en-us/articles/206455647
If your hosting provider is not on this list like Inmotion, you can simply Google Search how to add nameserver to (hosting provider) like I did with inmotion: http://www.inmotionhosting.com/support/domain-names/dns-nameserver-changes/change-domain-nameservers-amp
How to Sign up for CloudFlare account:
- Go to https://www.cloudflare.com/ and sign up for an account.
- To do this, click “sign up” at the page’s top right
- Enter your email address and create a password
- Agree to terms and conditions
- Click “create account”
- Add your domain name to your account. To do this, copy your site’s URL and paste it in the textbox under “add your website”. Remove the protocol part, in this case, https:// and the last slash / to remain with www.cloudflare.com
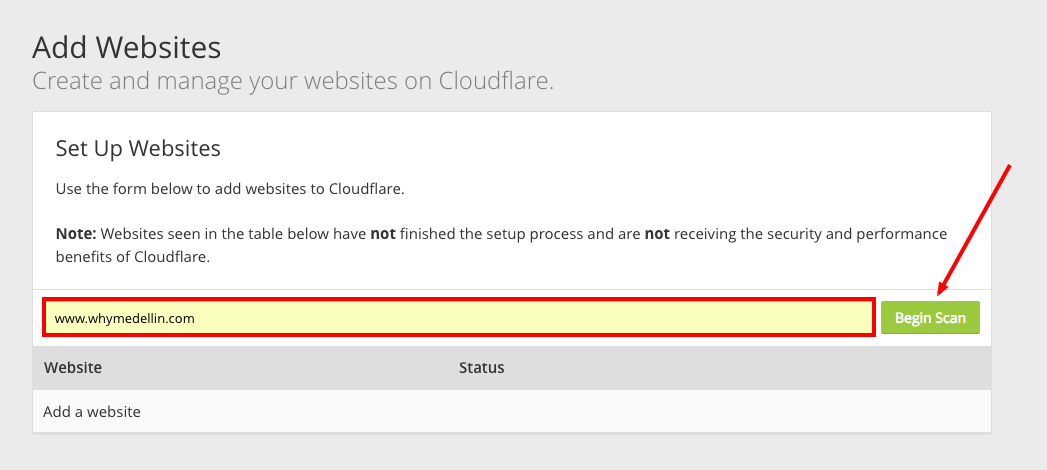
- You can add more than one URL, separated by commas
- Click “Begin Scan”
- CloudFlare will scan your domain name to see where it is pointed. This takes about 60 seconds.
- After it is done, click “continue”
- You will be directed to a page titled “verify that all of your DNS records are listed below”. Here you can use your hosting cPanel to countercheck the listings. Make sure that these two A and CNAME of your domain are enabled and continue.

- You will be directed to next page to select the plan you wish to sign up for. Click “continue”
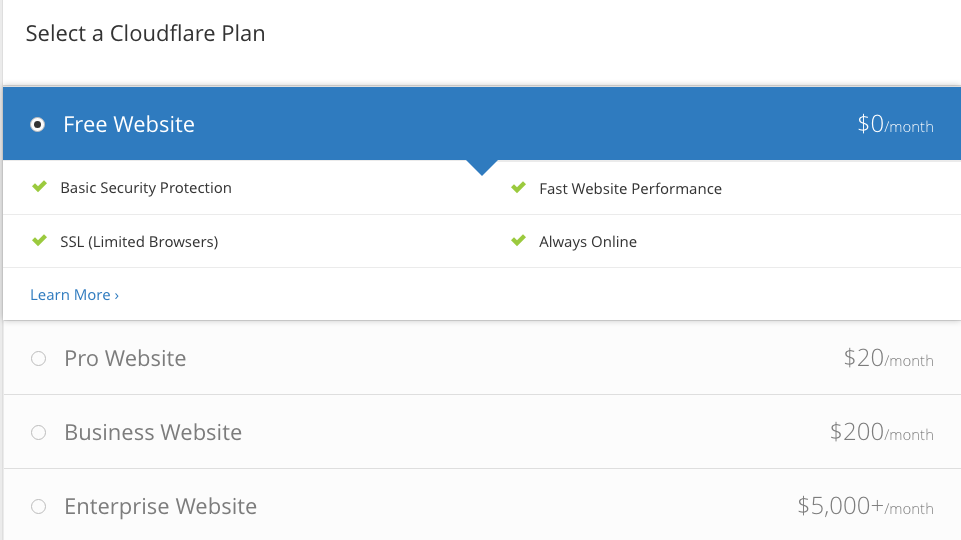
- Choose your plan. The free plan is okay for most sites. If you, however, want more security, especially if your site has any e-commerce on it, you may want to go for the pro or other higher plan.
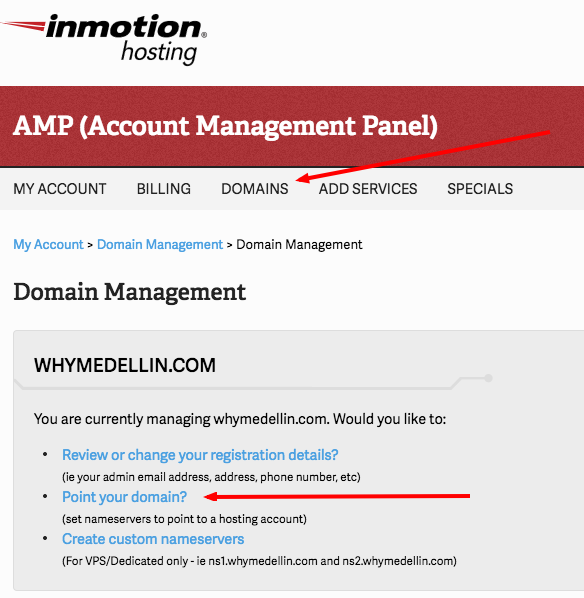
- CloudFlare will request you to change your name servers. You can do this from the domain section of your cPanel. For inmotion hosting, under AMP, you will click “Domain”, then “Manage Domain”. You will then click on “Point your Domain” where you will be directed to change your nameserver.
- You will need to remove your current Primary and Secondary and replace it with the Nameserver Cloudflare has provided you.
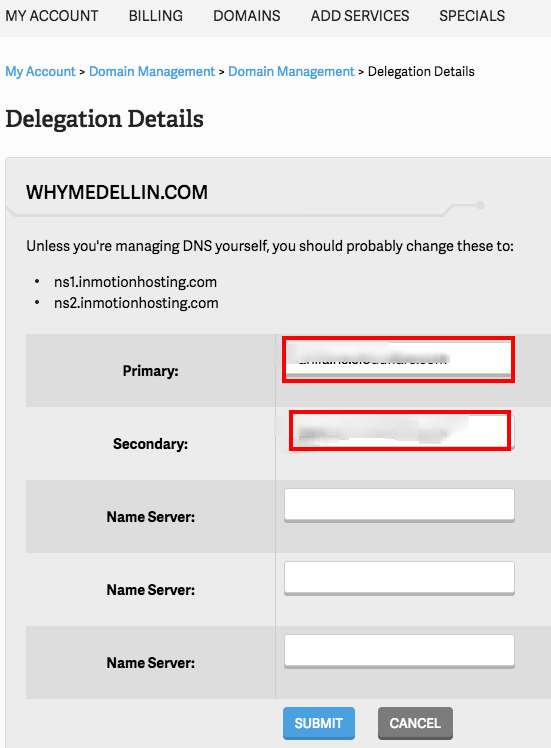
- Cloudflare should have provided you two Nameserver for you to replace your current ones. You can find them on your Cloudflare account under “Overview”.

- Once you’ve completed that setup, you would want to change few settings on your Cloudflare account.
- For CDN, choose the “safest” option. For security, choose “medium.” If you choose high, some of your visitors will be blocked yet they are your site’s ideal target market. If you are however getting a lot of attacks, you may want to choose the “high” option.
- Under “Crypto”, where you can add certificates, SSL, HSTS, HTTP Rewrites.
- Go through each of the settings on Cloudflare and see what options are available for you and if you need to select a different plan option for your needs.
- On your WordPress Dashboard, under the W3 Total Plugin, go to Extension and click on Cloudflare setting.
- You will need to Click “Authorize”

- You will need to enter your email address you used to login into your Cloudflare account.
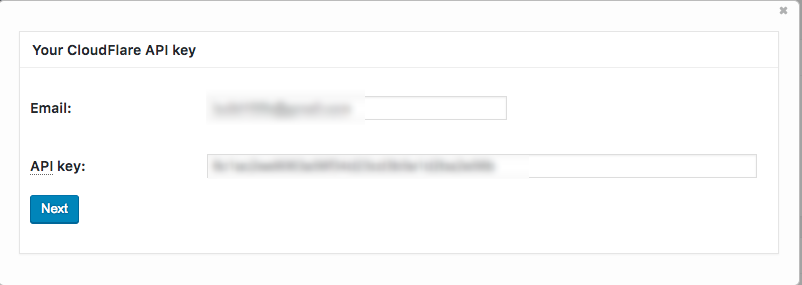
- You will need to get your API Key from Cloudflare account. Your Overview page should have Domain Summary, you can click on “Get your API key”.

- You will then look for API Key, Global API Key and view your API.

- Copy and paste it to your Cloudflare extension via the W3 Total plugin.
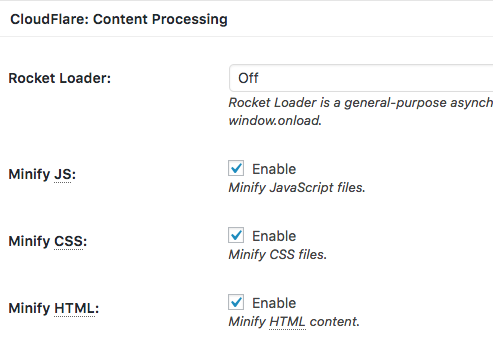
- Scroll down your Cloudflare extension settings and check Minify JS, CSS, and HTML. Click Save and you’re done.
I’ve taken my website from 16 second Load time to just under 6 seconds:

While you can see the improvement, it is still hard to keep it under 3 second with a shared hosting. If your site has a ton of content, you might reconsider having a dedicated hosting option versus shared hosting.
5. The number of plugins
While plugins are useful to help improve certain features and aspects on your WordPress site, having too many plugins will also slow your site down. Plugins tend to take up quite some bandwidth. Have a maximum of 15 plugins on your site. That said, here are a few more plugins that will help you increase your WordPress site’s speed that I have not used, but you can see if it helps your WordPress site.
- Better WordPress Minify
- WP-Optimize
- JS & CSS Script Optimizer
- BJ Lazy Load – This plugin is of particular interest because of how it works. It replaces images, posts, iframes, embedded videos, gravatar images, and post thumbnails with a placeholder. The content loads when the user scrolls down the page.
Focus on Conversion
Unless you're just working on a personal passion project, your website probably has some sort of goal to help your business performance. These goals are called conversions.
Use your SEO audits to find and fix issues that are hurting your users' desire and ability to convert.